FOOTBAG WORLDWIDE : Dat Phan's Gallery :Rod Laver Modificati...

Rod Laver Modification: Canvas Removal

These pictures are here to augment the footbag.org Rod Laver modification guide found here. Follow the first two steps then come back to this guide. I know this guide could be better (better pictures, clearer instructions, etc), so if someone feels they can make a better one please do.

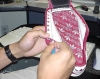
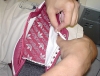
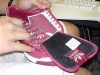
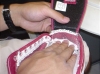
Removing the canvas from the inside and toe surfaces of Rod Lavers increases bag feel and reduces weight. Notes: Some players have started removing the mesh instead of the canvas on the inside surfaces of their lavers. This guide only shows how to remove the canvas, but that modification should be easy to figure out. Although they are intact in the pictures, be sure replace the stock insoles. Insoles made of Neoprene, such as the Spenco Court/Aerobic or Cross Trainer insoles, do a much better job of absorbing shock and reducing leg and back injuries.

Tools needed: Exacto knife, nerves of steel.

Before starting: let the lavers float upside down in a sink of hot water for 30 minutes. This makes the canvas swell up, which weakens the glue between the canvas and the mesh. Let them dry overnight before continuing.

This gallery has other related information; click here to see the related information.

 
Cut a line across the canvas

While holding the Exacto knife with the blade edge away from the shoe, cut strands of the canvas by plucking at them individually. Make a line about an inch or so long.

Be careful not to cut into the mesh. Don't worry if you cut a few threads of the mesh. It is pretty resiliant to unravelling. If you do cut a big slit in the mesh, use some matching thread and stitch it back up after the all canvas has been removed.

.
     
Peel the canvas away from the mesh

Pry the canvas and the mesh apart at the newly made line. Work some fingers in to help seperate the canvas and the mesh. Continue peeling and cutting around the rest of the inside. Cut all the way up to, but not including, the stitches.

.

     
Finished inside surface

This is what it should look like after you have removed the canvas from the insides. Now onto the toe.

     
Cut a line along the canvas between the tongue and the toe

Removing the canvas from the toe is a little bit more tricky, but definitely not impossible

Cut and peel a line along the seam where the tongue meets the toe. The sides of the mesh are prone to unravelling so becareful not to pull too hard at them.

.
     
Peel canvas inside toe downwards

Starting at the line, peel away the canvas and work some fingers up to the leather strip around the toe. To cut the canvas, have the blade edge of the knife point down and cut towards the insole of the shoe. Pressing the canvas against the insole makes it taut and easier to cut. Continue cutting all the way around the toe.

Lace them up and they're done! They should now feel like a comfortable second pair of socks. Stalls and sets should take less effort and have more control. Now go out and enjoy them, and remember to practice your flipside.

.
     

Copyright © 2003


what's new
overview
f.a.q.
reference area
clubs
events
results
photos
videos
freestyle
net game
members
discussion
IFPA
IFPA Groups
rules
links


Copyright © 2003, International Footbag Players' Association
A 501(c)(3) Non-Profit Corporation


Website implementation by Steve Goldberg. Graphic design by Eric Côté.
Copyright © 1994-2004, Int'l Footbag Players' Association, Inc.
A U.S. 501(c)(3) Non-Profit Corporation. DONATE NOW