WHAT'S NEW OVERVIEW F.A.Q. FORUM MEMBERS REFERENCE CLUBS EVENTS RESULTS PHOTOS VIDEOS FREESTYLE NET GAME IFPA GROUPS RULES LINKS
*Copyright © 2025, International Footbag Players' Association
A 501(c)(3) Non-Profit Corporation
Cutting the toe box
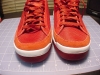
This is the first in a series of modifications I have done to my latest pair of nylon mesh Rod Lavers. Shoe modifications are NOT manditory. I would suggest playing in your Lavers as they are for several weeks before choosing to modify them. The mods I have chosen for my shoes work well for my partiular body and the way I play. They may not work as well for you and you are certainly not limited to what I have shown here.
toe_box_01.jpg
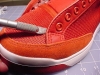
One of the more common modifications you can make to your Rod Lavers is making a few cuts in the front part of the shoe to make a 'toe box', in turn helping with toe stalls. Now, I've heard my fair share of "you're cheating!" or what have you. I always say that you can't win a drag race riding a tricycle. The absurd truth of it all tends to break any tension. My point is that to play any sport you need to have the right equipment. Since freestylers do not have a shoe made specifically for what they do, they have to find what's available and adapt it to fit their needs.
One of the more common modifications you can make to your Rod Lavers is making a few cuts in the front part of the shoe to make a 'toe box', in turn helping with toe stalls. Now, I've heard my fair share of "you're cheating!" or what have you. I always say that you can't win a drag race riding a tricycle. The absurd truth of it all tends to break any tension. My point is that to play any sport you need to have the right equipment. Since freestylers do not have a shoe made specifically for what they do, they have to find what's available and adapt it to fit their needs.
Photo by Alex "Zeke" Ibardaloza
toe_box_02.jpg
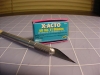
An X-acto knife is my tool of choice. It's precise and practical. I can do several mods using this one knife. You can find it in most art/office supply stores. I recommend buying extra blades too, cutting away material is much easier if you are constantly using sharp new blades.
An X-acto knife is my tool of choice. It's precise and practical. I can do several mods using this one knife. You can find it in most art/office supply stores. I recommend buying extra blades too, cutting away material is much easier if you are constantly using sharp new blades.
Photo by Alex "Zeke" Ibardaloza
toe_box_03.jpg
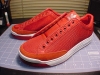
Remove shoe laces. After this mod the shoe has to be laced in a different manner to keep the flaps on the toe box up. Besides, this decreases the chances of accidentaly cutting them. It also helps to be sober.
Remove shoe laces. After this mod the shoe has to be laced in a different manner to keep the flaps on the toe box up. Besides, this decreases the chances of accidentaly cutting them. It also helps to be sober.
Photo by Alex "Zeke" Ibardaloza
toe_box_04.jpg
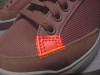
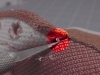
Basically, you want to cut the stitches that attach the sides of the shoe to the toe area. This provides a wider surface and walls to help your toe delays. You do NOT need to cut anything past the rough strip of leather running along below.
Basically, you want to cut the stitches that attach the sides of the shoe to the toe area. This provides a wider surface and walls to help your toe delays. You do NOT need to cut anything past the rough strip of leather running along below.
Photo by Alex "Zeke" Ibardaloza
toe_box_05.jpg
Place the blade at the top corner. Pull the side panel away to expose the first stitch then slowly and carefuly work the knife downward. Keep pulling the side away after every cut to expose more stitches. .
Place the blade at the top corner. Pull the side panel away to expose the first stitch then slowly and carefuly work the knife downward. Keep pulling the side away after every cut to expose more stitches. .
Photo by Alex "Zeke" Ibardaloza
toe_box_06.jpg
Notice the thread in the highlighted area. Pulling apart with every cut makes it easier to see the next thread.
Notice the thread in the highlighted area. Pulling apart with every cut makes it easier to see the next thread.
Photo by Alex "Zeke" Ibardaloza

toe_box_07.jpg
When you've finished cutting both sides you can relace the shoe or you can move on to some other modifications. .
When you've finished cutting both sides you can relace the shoe or you can move on to some other modifications. .
Photo by Alex "Zeke" Ibardaloza
toe_box_08.jpg
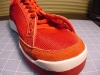
This is the finished shoe with a lacing pattern I came up with. Keep in mind that this is just an aid. This does not automatically make you a master of tricks and delays. That only comes from hours and hours of practicing good technique.
This is the finished shoe with a lacing pattern I came up with. Keep in mind that this is just an aid. This does not automatically make you a master of tricks and delays. That only comes from hours and hours of practicing good technique.
Photo by Alex "Zeke" Ibardaloza