The following footbag patterns are available in both PostScript and GIF formats. If you have any way of dealing with PostScript, click on the PostScript button next to the pattern you are interested in to download the file, because the PostScript version is much better. For example, you can adjust the size of the PostScript version. There is more information about dealing with PostScript in the Footbag Pattern FAQ.
The GIF versions have been rendered for a radius of 1.125 inches, although you probably won't be able to read this on the GIF patterns. This makes an average sized bag. If you just want to look at the patterns, you can see the GIF versions by clicking on the GIF button next to the pattern. If you want to print the GIF version, you can print the GIF directly from your browser. If you have image hacking software you should use your browser to download the file (usually by clicking and holding in Netscape, or by using the File menu in Mosaic; other browsers and platforms will vary).
Note: when you print the patterns, make sure that the 1-inch vertical and horizontal scale bars are exactly one inch long, or the pattern will not work. See the caveats about GIF files
Each pattern includes a picture of the finished bag, but you will need to know how many of each shape to cut out. This information is included below, but not on the patterns, so you will need to note the numbers of the shapes. The name of the pattern prints out on the pattern, but the name is typically some short name more-or-less derived from the official name listed below.
For more information about using the patterns, see the Technical Notes on the PostScript Files and How I Use the Patterns. For answers to questions about the patterns, materials, sewing, washing and other issues about footbags in general, see the Footbag Pattern FAQ.
There are a couple of parameters that you might want to adjust in the files. First, you can adjust the radius of your finished bag; the radius is usually computed from the center to one of the vertexes of the polyhedron, or from the center to the center of an edge.
I have put in values for the radius that make bags that I think are a pretty good size, but you will want to adjust to your own liking. The radius is specified in inches in a line at the beginning of the file:
/radius 1.13 def
Just edit the number ("1.13" in this case) to be bigger or smaller. You'd be surprised how a small change (like .05 inches) can radically alter the weight and size of a bag.
Another thing you might need to change is the font defined for printing the labels on the patterns. If your printer doesn't want to print the patterns, it may not have the Helvetica-Narrow-Bold font. Just change the font in the file to Helvetica or Times-Roman, ie change the line
/Helvetica-Narrow-Bold findfont 10 72 div scalefont setfont
to
/Helvetica findfont 10 72 div scalefont setfont
Finally, there is a parameter to control the width of the flange (more about that below) that is added to the panels for sewing. The parameter (flangewidth) is defined just like the radius, and the default value is .2 inches:
/flangewidth .2 def
Just change the .2 to be whatever works for you.
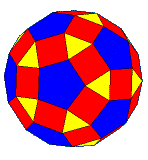
I have also included images of the finished footbags, which were printed out using Kaleidotile, a very cool program.
This is rather difficult to explain -- and even more difficult to justify. I am very particular about sewing.
As you will notice, each shape in the pattern is drawn twice, once with notches and once without. The templates without notches are actually oversized --- the corners of the _notches_ are actually the corners of the finished panels. Reason for the notches is to allow me to draw sewing guides on the material, and my seams are sewn from notch-corner to notch-corner.
First, cut out the patterns roughly and glue-stick them to a stiff piece of paper -- I use a file folder. Then cut the pieces more precisely along the printed lines. This gives you a fairly durable, accurate template for drawing on the Facile or whatever you are using to sew.
I use the following procedure for drawing the pattern on the material.
To sew them together, I use medium-weight polyester thread. Some people say this may tend to tear facile, but I have never had a problem and it's much easier to deal with than the rope most bags are sewn with.
My sewing proceedure is to line up the the edges of two pieces and clamp them together with a tiny binder clip (those little black triangular clips with the flip-down handles). If you cut out your pieces carefully, the edges will line up correctly. If you are sewing a bag with different shaped pieces, the edges of the pieces won't be the same length and you have to center the smaller piece on the larger. The following picture tries to show how this might look for a hexagon and square being sewn for an 'octacube' -- the '.' indicates the corner of the notch drawn on each piece, which should line up on both pieces. That is, if you stick your needle in the dot on one side, it should come out the dot on the other.
       ________________     ___
      |/              \|     ^
      /                \     | .2 inch
     /|   .        .   |\   _|_
    / |                | \
Using the binder clip makes it easier for me to sew straight from one dot to the other.
Note that the patterns are drawn such that there is a .2 inch flange of material outside the seam. Once I am done with all but the last one or two seams, I use a good pair of sewing sissors to cut off of the leftover 'flange' material about 2mm from the seam.
Well, that's about it.
  __/ _ _/  Eric Tiffany            Ascent Technology, West   413-458-0284
 __/   /   erict@ascent.com        171 The Knolls            FAX 458-2163
__/  _/   etiffany@williams.edu   Williamstown, MA 01267    617-225-0850
Copyright © 1995 Eric Tiffany for Footbag WorldWide